This post explains the steps required to build and deploy custom SSIS components. For the purpose of illustration, the Custom SSIS Data Flow Component – Credit Card Number Validator (CCNV) is used.


Step 1 – Create Strong Name Key (SNK) for the Assembly
From Visual Studio, open the Class Library of your Custom SSIS Component. Navigate to Project→Properties from toolbar
Navigate to the Signing tab and Select the options as shown in Figure 2.
Enter a Strong Name Key (SNK) file as shown in Figure 3. Protect it with a password (optional).
Step 2 – Build the Assembly
Step 3 – Deploy the Assembly to BIDS SSIS Folder
The SSIS Designer in BIDS locates the custom components available for use in packages by enumerating the files found in a series of folders located under C:\Program Files\Microsoft SQL Server\100\DTS\ (for SQL Server 2008) or C:\Program Files\Microsoft SQL Server\90\DTS\ (for SQL Server 2005). If your default SQL Server Installation uses a different path, then use the registry key HKLM\SOFTWARE\Microsoft\MSDTS\Setup\DtsPath to locate this folder.
Copy the Assembly from \bin folder to the appropriate sub-folder. The assembly for Data Flow Components like Credit Card Number Validator (CCNV05) is copied to the sub-folder PipelineComponents. Overwrite the Assembly if it already exists.
❗IMPORTANT: On 64-bit OS use the 32-bit Program Files folder e.g. C:\Program Files(x86)\Microsoft SQL Server\100\DTS\, since the current version of BIDS is still a 32-bit application.
Step 4 – Install the Assembly to Global Assembly Cache (GAC)
Navigate to %system%\assembly folder . It’s usually C:\Windows\Assembly. Drag and Drop the Assembly from \bin folder to %system%\assembly folder. If the assembly already exists, right-click and uninstall existing assembly and then install the new version.
IMPORTANT: You must close and reopen BIDS SSIS Designer after you install a new version of your custom object.
Step 5 – Adding the Custom Component to the Toolbox
Now comes the best part where you can see your custom component in action. From BIDS, open any SSIS project.
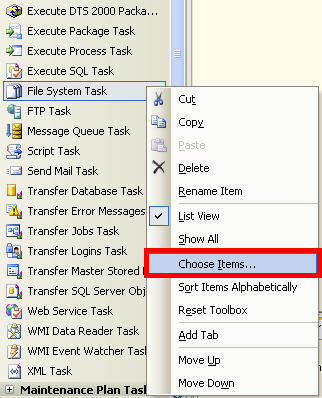
Right-click the toolbox and then click Choose Items (Figure 4).

In the Choose Toolbox Items dialog box, click the Data Flow Items and Select your custom component (Figure 5), in this case Credit Card Number Validator

Now your toolbar displays your Custom SSIS Data Flow Component (Figure 6).
Your Custom SSIS Component is now ready for Action.


Hi Benny,Does it work in Data tool 2012 environment! Nidhin
Nidhin, it should work in SSDT
Once I have added the component to a package, making changes to the component code and rebuilding the solution does not appear to refresh/update the component in the SSIS package. Is there something special that I need to do to get changes to “take”? As an example, I changed the text in ComponentMetaData.Description, rebuilt the solution, and when I open the SSIS pakcage, it still shows the old description. Thank you!
Chris, few things to check
a) After making the code change did you deploy the component to GAC ? You should un-install the existing component and re-deploy the new version to GAC.
b) if you are an SSIS developer you would also need to copy the component to the BIDS folder (step 3 on the post) so that BIDS would reflect the latest change. This step is optional if you are doing a deployment on server.
c) if after checking a) and b) and still it does not work, remove your component from BIDS toolbar. Save your work and restart BIDS and add the component again to the toolbar.
SQL Server 2008 version of this component is now available for download from CodePlex. http://ccnv08.codeplex.com
Thanks a lot. I am new to SSIS and was looking for this solution.
When I attempt to build the application, I receive the following error,
Error 1 The type or namespace name ‘IDTSOutputColumn90’ could not be found (are you missing a using directive or an assembly reference?) C:\Workspace\ConvertMigrateFromDCTtoSSIS\CCNV05-0908Aug-R1\CCNV05-0908Aug-R1\CreditCardValidator\CreditCardValidator\CCNValidator.cs 167 24 CreditCardNumberValidator
I have added the reference for microsoft.sqlserver.dtspipelinewrap.dll.
Do you have any suggestions?
TIA.
Roger, pls add reference to Microsoft.SQLServer.DTSRuntimeWrap.dll and Microsoft.SqlServer.PipelineHost.dll in addition to Microsoft.SqlServer.DTSPipelineWrap.dll. Let me know if that works. Thanks
IDTSOutputColumn90 is IDTSOutputColumn100 in CS2008
Source Code and Assembly for Credit Card Number Validator can be downloaded from CodePlex http://ccnv05.codeplex.com/